|
|
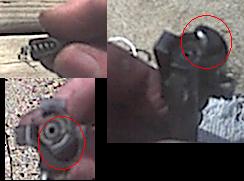
Here
is a picture of the bolt, your bolt may look slightly
diffrent, but the parts should be the same. Take
note of the two pinholes. The top hole stores the
pin for the extractor, and the bottom one holds
the pin for the firing pin. |
| Using
the pin punch insert the smaller end of the punch
into the bottom hole. Once inserted slowly push
the pin out. If the smaller end of the punch will
not fit into the pinhole try the other side of the
pinhole. Once the pin has fallen out remove the
pin punch and dump the firing pin out of the bolt(shown
below). Be VERY careful not to lose the firing pin
retainer pin. |
|
 |
|
|
After
the firing pin is removed, insert the punch into
the top pinhole. You must insert the pin punch on
the side in which the extractor retainer pin is
flat and not shaped at an angle. As you begin to
push the pin out use your thumb to apply pressure
on the extractor to make the pin come out easier.
Once the pin has been fully pushed out DO NOT let
your thumb off of the extractor. Under the extractor
is a spring, to prevent it from flying off into
the unknown I recommend you let go of the extractor
in a plastic bag. Once the extractor has been removed
be VERY careful not to lose the small spring and
the extractor pin. |
|
Well you have now fully disassembled the bolt.
Take note of the small parts.
Part List:
A. Bolt
B. Firing Retainer Pin
C. Extractor Retainer Pin
D. Extractor
E. Extractor Spring
F. Firing Pin
|
|
|
|
Reassembly
is done exactly in the reverse order of assembly,
except for a few note worthy twist. The first step
to reassemble is reinstalling the extractor. To
reinstall, place the small spring back inside of
the extractor. Next place the extractor, with the
spring inside, back into the bolt. Make sure the
inside curved part of the bolt is facing towards
the center. Once the extractor is in place line
up the extractor pin as shown in the drawing below,
so the slant on the extractor pin does not obstruct
the firing retainer pin's path. If it is not lined
up this way the pin that retains the firing pin
will not fit. Once the pin is lined up, press down
firmly on the extractor and insert the pin. The
pin should get to hard push by hand or with a punch.
To insert the pin the rest of the way find a hard
90 degrees surface and press the pin in until flush
with bolt. Luckily, the specific spot on the bolt
were this pin is inserted is almost cut to 90 degrees
so a table edge should push the pin flush. Once
the pin is flush with the bolt use the pin punch
to push it even further into the bolt until you
can see all the way through the pinhole that holds
the firing retainer pin. |
 |
| The picture
above depicts the bolt with the face portion standing
up. This is an example of how the angled portion
of the extractor retaing pin(Red Pin) needs to be.
Always remeber to put the slant on the pin like
it is shown, you will know if you did this correctly
if you can clearly see through the firing retainer
pinhole(Blue Pin). |
| Once
you have the extractor correctly installed, its
time to reinstall the firing pin. Again this portion
of the assembly has a twist to it. Taking a look
at the firing pin you will notice its oddly shaped
near the front pointy end. The firing pin is shaped
like this so the firing retainer pin can hold it
into place. |
|
| Click
here to goto page 2 |